Media playing
Users often need to play video and audio files during online social and business interactions. Video SDK enables you to add media playing functionality to your app. This page shows you how to use the media player classes in Video SDK to enable your users to publish media files to a channel.
Understand the tech
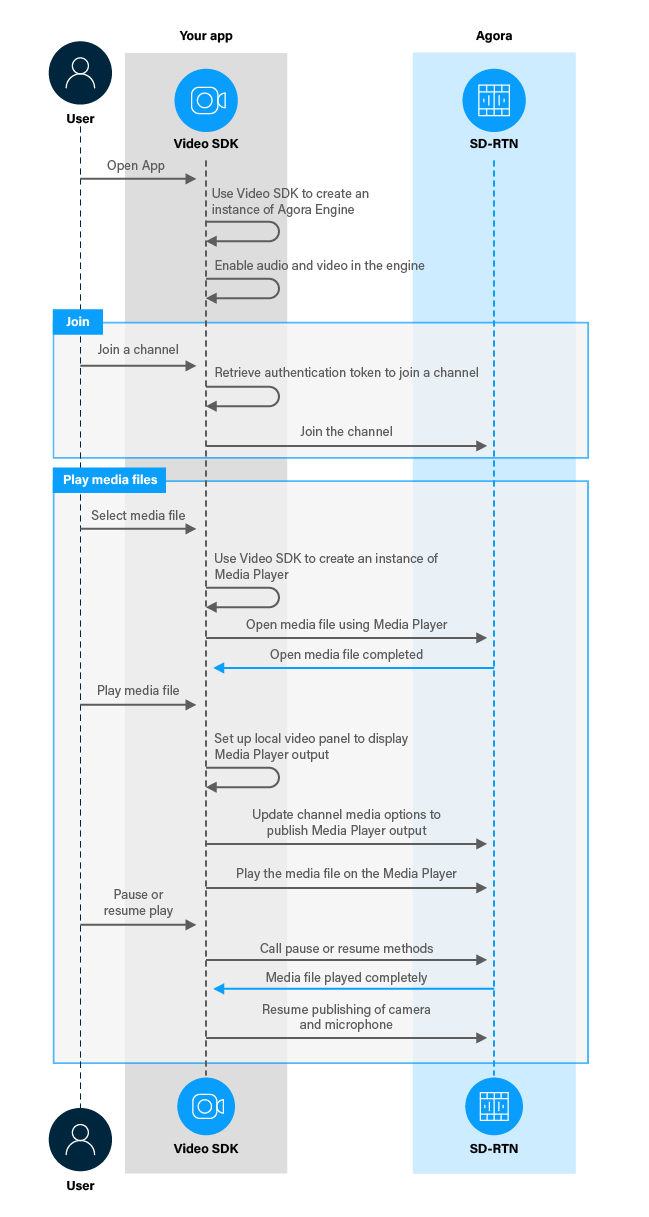
When a user selects a media file to play, you open the media file using a media player instance. When the file is ready to be played, you setup the local video container to display the media player output. You update the channel media options to start publishing the media player stream, then stop publishing the camera and microphone streams. The remote user sees the camera and microphone streams of the media publishing user replaced by media streams.
The following figure shows the workflow you need to integrate media player functionality into your app.

Prerequisites
In order to follow this procedure you must have:
- Implemented Get Started with Interactive Live Streaming
- Android Studio 4.1 or higher.
- Android SDK API Level 24 or higher.
- A mobile device that runs Android 4.1 or higher.
-
A computer with Internet access.
Ensure that no firewall is blocking your network communication.
Project setup
To create the environment necessary to implement playing media files into your app, open the project you created in Get Started with Interactive Live Streaming.
Add a media player to your app
This section shows how to use the Video SDK to implement a media player into your app, step-by-step.
Implement the user interface
In a real-word application, you provide several buttons to enable a user to open, play, pause and stop playing files in the media player. In this simple example, you use a single Button to demonstrate the basic media player functions. You also add a ProgressBar to display the play progress to the user.
To add the UI elements, in /app/res/layout/activity_main.xml, add the following code before </RelativeLayout>:
Handle the system logic
To setup your project to use the media player APIs and access the UI elements, take the following steps:
-
Add the required libraries
To import the required Agora and Android libraries, in
/app/java/com.example.<projectname>/MainActivity, add the following to the list ofimportstatements: -
Declare the variables you need
To create and manage an instance of the media player and access the UI elements, in
/app/java/com.example.<projectname>/MainActivity, add the following declarations to theMainActivityclass: -
Access the progress bar
In the
onCreatemethod of theMainActivityclass, add the following line at the end:
Implement media player functions
To implement playing and publishing media files in your app, take the following steps:
-
Open, play and pause media files
When a user presses the button for the first time, you create an instance of the media player, set its
mediaPlayerObserverto receive the callbacks, and open the media file. When the user presses the button again, you play the media file. On subsequent button presses, you pause or resume playing the media file alternately. To do this, add the following method to theMainActivityclass: -
Manage media player callbacks
The
IMediaPlayerObserverimplements media player callbacks. You create an instance ofIMediaPlayerObserverand register it with the media player instance. When the player state changes, you take appropriate actions to update the UI inonPlayerStateChanged. You use theonPositionChangedcallback to update the progress bar. To create an instance namedmediaPlayerObserver, add the following code to theMainActivityclass: -
Configure Agora Engine to publish the media player stream
You use
ChannelMediaOptionsand theupdateChannelMediaOptionsmethod to specify the type of stream to publish. To switch between publishing media player and camera and microphone streams, add the following method to theMainActivityclass: -
Display media player output locally
Create a
VideoCanvasand use it in thesetupLocalVideomethod of the Agora Engine to show the media player output locally. To switch between displaying media player output and the camera stream, replace thesetupLocalVideo()method in theMainActivityclass with the following: -
Update the
joinChannelmethodWhen you join a channel, you set up the local video panel to initially display the camera output. In the
joinChannel(View view)method, replacesetupLocalVideo();with a call to the updated method: -
Clean up when you close the app
To free up resources when you exit the app, add the following lines to the
onDestroymethod aftersuper.onDestroy();:
Test your implementation
To ensure that you have implemented media player features into your app:
-
Generate a temporary token in Agora Console .
-
In your browser, navigate to the Agora web demo and update App ID, Channel, and Token with the values for your temporary token, then click Join.
-
In Android Studio, open
app/java/com.example.<projectname>/MainActivityand updateappId,channelNameandtokenwith the values from Agora Console. -
Connect an Android device to your development device.
-
In Android Studio, click Run app. A moment later, you see the project installed on your device.
If this is the first time you run the app, grant camera and microphone permissions.
- Click Join to start a call.
-
Press Open Media File.
After a short while, you see a toast message confirming that the media file is opened successfully.
-
Press Play Media File
You see the media file played both locally and in the web demo app. The progress bar indicates the play progress.
-
Press Pause Playing Media
Media publishing is paused and the camera and microphone publishing is resumed.
-
Press Resume Playing Media
You see that the media file resumes playing.
-
Wait for the media file to finish playing. When the progress bar reaches the end, the media player publishing is stopped and camera and microphone publishing is resumed.
Reference
This section contains information that completes the information in this page, or points you to documentation that explains other aspects to this product.