SDK quickstart
Instant messaging connects people wherever they are and allows them to communicate with others in real time. The Chat SDK enables you to embed real-time messaging in any app, on any device, anywhere.
This page shows a sample code to add peer-to-peer messaging into your app by using the Chat SDK for Android.
Understand the tech
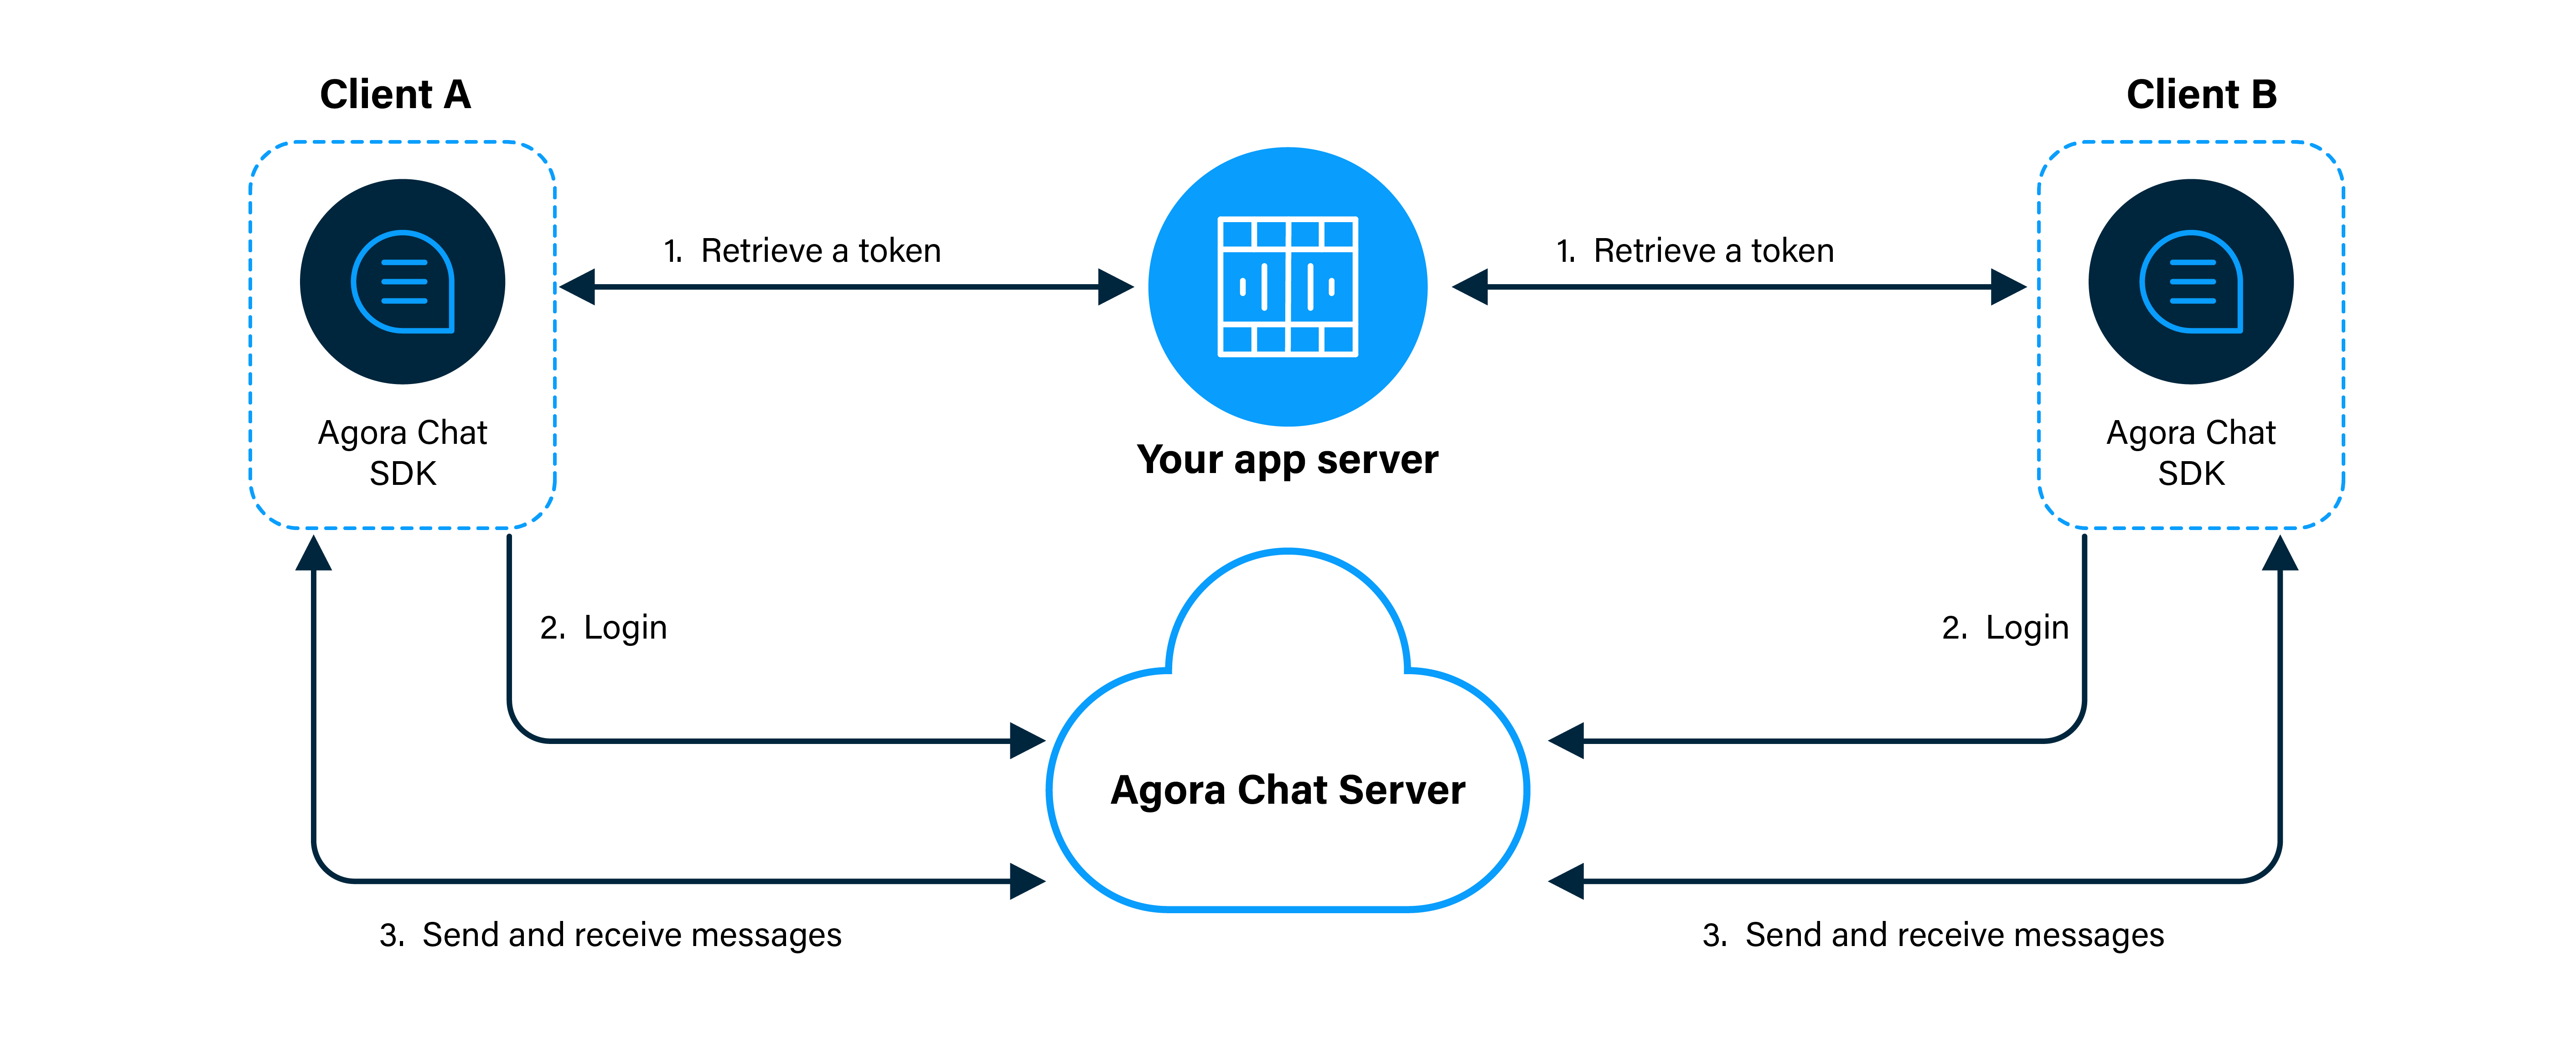
The following figure shows the workflow of how clients send and receive peer-to-peer messages.

As shown in the figure, the workflow of peer-to-peer messaging is as follows:
- Clients retrieve a token from your app server.
- Client A and Client B log in to Chat.
- Client A sends a message to Client B. The message is sent to the Chat server and the server delivers the message to Client B. When Client B receives the message, the SDK triggers an event. Client B listens for the event and gets the message.
Prerequisites
In order to follow the procedure in this page, you must have:
- An Android simulator or a physical Android device.
- Android Studio 3.6 or higher.
- Java Development Kit (JDK). You can refer to the User Guide of Android for applicable versions.
Project setup
Follow the steps to create the environment necessary to integrate Chat into your app.
-
For new projects, in Android Studio, create a Phone and Tablet Android project with an Empty Activity.
After creating the project, Android Studio automatically starts gradle sync. Ensure that the sync succeeds before you continue. -
Integrate the Chat SDK into your project with Maven Central.
a. In
/Gradle Scripts/build.gradle(Project: <projectname>), add the following lines to add the Maven Central dependency:The way to add the Maven Central dependency can be different if you set dependencyResolutionManagement in your Android project.b. In
/Gradle Scripts/build.gradle(Module: <projectname>.app), add the following lines to integrate the Chat SDK into your Android project:minSdkVersionmust be 21 or higher for the build process to succeed.- For the latest SDK version, go to Sonatype.
-
Add permissions for network and device access.
In
/app/Manifests/AndroidManifest.xml, add the following permissions after</application>:These are the minimum permissions you need to add to start Chat. You can also add other permissions according to your use case.
-
Prevent code obfuscation.
In
/Gradle Scripts/proguard-rules.pro, add the following line:
This section shows how to use the Chat SDK to implement peer-to-peer messaging in your app step by step.
Create the UI
-
To add the text strings used by the UI, open
app/res/values/strings.xmland replace the content with the following codes:When fetching a token, your token server may differ slightly from our example backend service logic.
To make this step easier to test, use the temporary token server "https://a41.chat.agora.io" provided by Agora in the placeholder above(Developer Token Server). When you're ready to deploy your own server, swap out your server's URL there, and update any of the POST request logic along with that.
If you have already got an account and user token, you can ignore this section and go to the next. -
To add the UI framework, open
app/res/layout/activity_main.xmland replace the content with the following codes:
Implement the sending and receiving of messages
To enable your app to send and receive messages between individual users, do the following:
-
Import classes. In
app/java/io.agora.agorachatquickstart/MainActivity, add the following lines afterimport android.os.Bundle;: -
Define global variables. In
app/java/io.agora.agorachatquickstart/MainActivity, before adding the following lines afterAppCompatActivity {, ensure you delete theonCreatefunction created by default. -
Initialize the view and the app. In
app/java/io.agora.agorachatquickstart/MainActivity, add the following lines after theonCreatefunction: -
Retrieve a token. To get a token from the app server, add the following lines after the
initSDKfunction: -
Add event callbacks. In
app/java/io.agora.agorachatquickstart/MainActivity, add the following lines after theexecutefunction: -
Create a user account and log in to the app. To implement this logic, in
app/java/io.agora.agorachatquickstart/MainActivity, add the following lines after theinitListenerfunction: -
Start a chat. To enable the function of sending messages, add the following lines after the
registerfunction: -
Click
Sync Project with Gradle Filesto sync your project. Now you are ready to test your app.
Test your app
To validate the peer-to-peer messaging you have just integrated into your app using Chat:
-
In Android Studio, click
Run 'app'.You see the following interface on your simulator or physical device:
-
Create a user account and click SIGN UP.
-
Sign in with the user account you just created and send a message.
-
Run the app on another Android device or simulator and create another user account. Ensure that the usernames you created are unique.
-
Send messages between the users.
Next steps
For demonstration purposes, Chat provides an app server that enables you to quickly retrieve a token using the App Key given in this guide. In a production context, the best practice is for you to deploy your own token server, use your own App Key to generate a token, and retrieve the token on the client side to log in to Agora. To see how to implement a server that generates and serves tokens on request, see Generate a User Token.
In addition to integrating the Chat SDK into your project with mavenCentral, you can also manually download the Chat SDK for Android.
-
Download the latest version of the Chat SDK for Android, and extract the files from the downloaded SDK package.
-
Copy the following files or subfolders from the libs folder of the downloaded SDK to the corresponding directory of your project.
File or subfolder Path of your project agorachat_X.Y.Z.jar~/app/libs//arm64-v8a/libagora-chat-sdk.soandlibsqlite.so~/app/src/main/jniLibs/arm64-v8a//armeabi-v7a/libagora-chat-sdk.soandlibsqlite.so~/app/src/main/jniLibs/armeabi-v7a//x86/libagora-chat-sdk.soandlibsqlite.so~/app/src/main/jniLibs/x86//x86_64/libagora-chat-sdk.soandlibsqlite.so~/app/src/main/jniLibs/x86_64/X.Y.Z refers to the version number of the Chat SDK you downloaded.
Reference
For details, see the sample code for getting started with Chat.